Showing posts with label frugal gaming. Show all posts

Monday, 19 July 2021

More Frugal Gaming: Grimdark Future Challenge, Part II

 In my last post, I introduced a project I'm currently working on: creating a 2,000-point army for Grimdark Future while spending less than £55. To create the core of my Human Inquisition army list, I picked up some Frostgrave and Stargrave sprues, and used them to assemble the Inquisitor's retinue. This is going to include: 

  • four assassins, badass killing machine characters who eat up a lot of points. 
  • three daemonhosts, hapless souls who blast out gouts of demonic energy. 
  • three crusaders, heavily armoured sword-fighters. 
  • three psychics, just this side of being a daemonhost. 
In this post, we'll take a look at some sample models I've built for each of these units. We've already seen the sniper assassin. 


Here he is again, though, just for completeness.


Here's the first psychic. I've decided to go for quite simple paint jobs for this army, but I think they'll look nice anyway. He has a Frostgrave cultist body and arms, with a hand swap from a Stargrave sprue to give him the regulation pistol as well as a melee weapon from the Frostgrave demon sprue. His head is another Stargrave head.

When you think of the Inquisition, you think of red robes, so I want to give all the models in the core retinue some red and off-white (except for the assassins, who of course will be in sinister black). 


The second psychic has the body and arms of a Frostgrave cultist, although I've replaced the blade of his spear with a bead to make it a staff. The head and holstered pistol come from a Stargrave sprue. His pistol is holstered for drawing with the right hand, which is going to be inconvenient if he's got a staff in it, but no one said these guys were military geniuses. I tried a little OSL effect from the staff, but it doesn't look great in the photo -- in real life, the different swirling colours on the orb are more distinguishable. I may touch up the face, but it looks OK at arm's length. 


Next, we have the first daemonhost. The body is another Frostgrave cultist, and I wanted to suggest that this is a former psychic; the other two bodies will be more Crusader-like just because that's what I have. The head is a Stargrave head, the arms are from the cultist sprue, and the tail is from the demon set. I wanted to give the impression that the daemons in these bodies have warped and mutated them but are still restrained by some kind of ward, so I gave him a glowing chain of relics around his neck. The daemonhosts are going to look quite different from one another, but hopefully the unit as a whole will work out. 


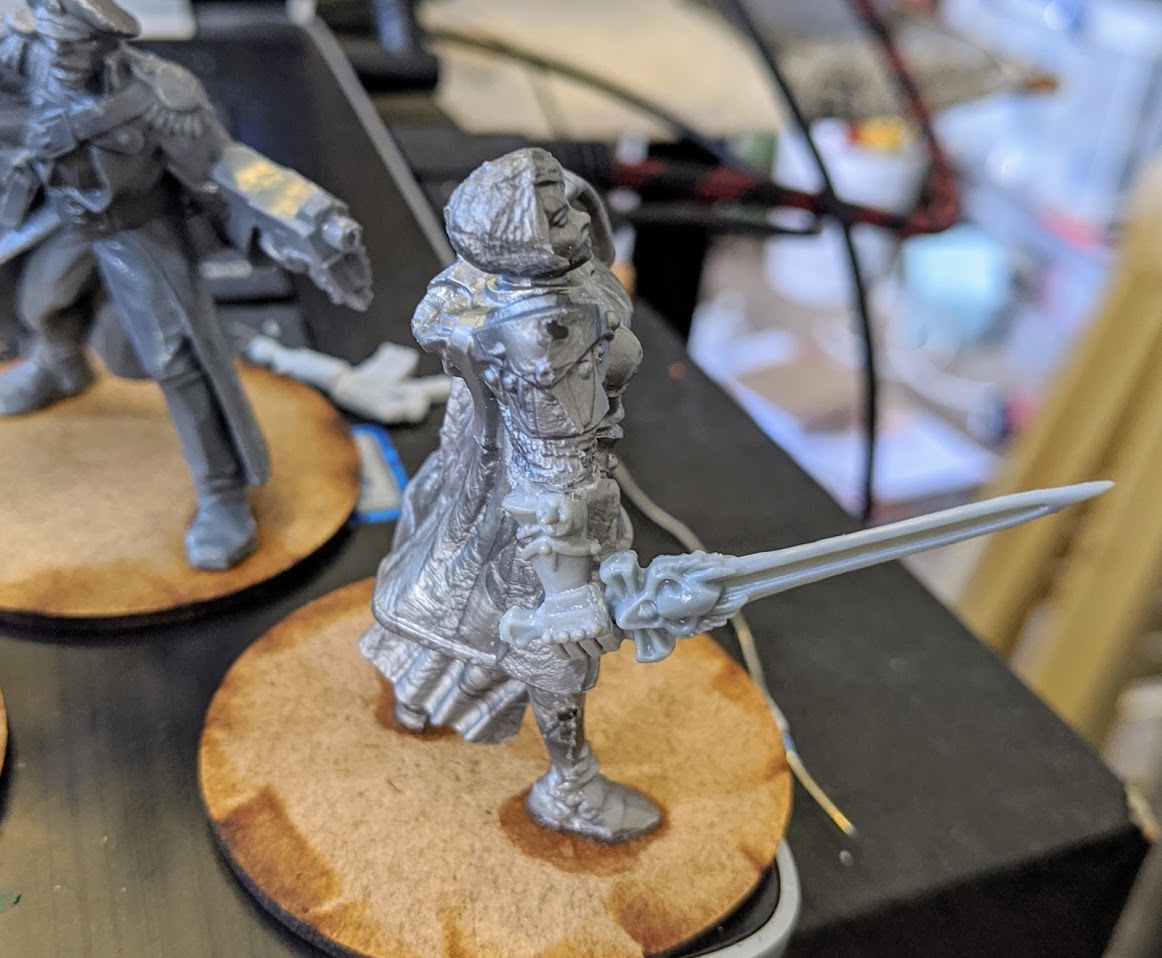
This is the first of the Crusader unit. These are heavily-armoured melee fighters equipped with energy swords. I used the body and shield from a Frostgrave demon sprue to give a suitably gothic look -- these are supposed to be very medieval figures -- but added a sci-fi head from a Stargrave sprue to link it in to the rest of the army. I reversed the balance of the white-and-red colour scheme seen on the psychics so that the unit will be easily distinguishable but the army's colours will stay consistent. I think he looks not bad. I wanted to make the armour look weathered and battered partly for thematic reasons but also partly because I worried the bright red would look a little too Space-Marine-y otherwise. 

Thursday, 8 July 2021

More Frugal Gaming: Grimdark Future Challenge

 Over on Facebook, Badger Bodges proposed a challenge: create a 3,000-point army for the sci-fi wargame Grimdark Future while spending only £55. I decided to undertake it. In fact, I'm not even going to spend £55: I'm mainly going to use models already in my collection, but I will keep track of what they cost and not go over £55. 

£55 is the cost of a Start Collecting Astra Militarum box from Games Workshop. Start Collecting boxes are a more affordable way to, er, start collecting Citadel miniatures, and I don't know if Badger picked the Astra Militarum one because it's singularly unimpressive, but in it you get: 

  • 10 Cadian Shock Troops
  • A heavy weapons team
  • A Commissar
  • A Leman Russ
So that's ten regular troops, a character, a heavy weapon, and a tank. Nice variety, but I think we should be able to do rather better than that. 

After looking at the Grimdark Future army lists, I decided to go with a mixed force. My starting point will be the Human Inquisition list. This is a very weird army list full of small, specialist squads and unusual characters. It should provide a core of unique characters to build the army around, which I can then bulk up with some regular infantry squads built using the Human Defense Force and Battle Brothers lists. 

To get things started off, I'm going to buy some sprues online (well, I'm not; I already own them. But for the purposes of this exercise let's assume I am). These will provide the materials for some of our characters, and also help us build up some bits for conversions when we come to cheaper figures later on. One of the challenges I'm dealing with here is working without my bits box: I have a pretty good collection, built up over decades, but I'm trying to do without it here as a way to show that this is possible using only resources available to everyone. 

So here are my starting expenditures, based on eBay prices. These may seem high given our limited overall budget, but I think you'll see that they come in handy throughout the project: 

  • Frostgrave cultist sprue: £6
  • Frostgrave demon sprue: £6.50
  • Stargrave mercenary sprue: £6
  • Stargrave trooper sprue: £6
So that's £24.50 spent so far, but as I hope you'll see, these bits are going to go a long way. We'll also need some bases for this project; I don't know how many just yet, but I'm keeping some room in my budget for them. I'm basing my cost on 3mm MDF bases on eBay, which is what I use for my Stargrave and Dragon Rampant armies. Let's spend £2 for now, which should get us all the bases we need for this phase of the project. 

First things first, let's make some of the characters at the core of the army. Not only will these make a fun visual centrepiece for the project, they'll eat up a hefty chunk of points. Taking a look at the Inquisition army list, a team of assassins seems useful. I'll start out by using the sprues to make a Sniper assassin. This is a mixture of bits from the Frostgrave Trooper and Mercenary Sprues 


I need to think of a good logo for my inquisitors that I can use to mark the plate on the back of the armour. Otherwise this model is good to go once I touch up that splotch on his leg.

Next we're going to add some Battle Brothers. These elite infantry are going to serve two purposes: they're going to give us some versatile armoured troops who can engage enemies at medium range and hold positions for us, and they're going to soak up a big wodge of points in our army list. Actually, three purposes: they're going to provide us with a few spare bits that will help us make our other units down the line. 

For my Battle Brothers, I'm going to be using Space Rangers. These monopose (well, duopose) plastics were released by Grenadier in the early 1990s as an alternative to Space Marines for the budget-conscious gamer. I was a budget-conscious gamer even at that young age, and my brother and I bought a big box of these. These are in fact those self-same models, bought over 25 years ago. However, you can still get them from em-4, a snip at just £2.99 for five models, bringing us to a total of £29.49. We're going to include five to ten in our army eventually, but let's start out with a single test model for now. 


These are nicely massive models. Like the assassin, I'm going to add some inquisitorial heraldry when I figure out how I want to do it. 

Using the sprues, I am now assembling twelve more models: three Daemonhosts, three Crusaders, three Psychics, and the remaining three assassins: Spy, Assault, and Terror. Here's a little look at these models in progress: 


So, we've spent nearly £30 of our £55 budget so far. How are we doing on points? Well, here's the list as it stands: 

Assault Assassin: 180 pts
Spy Assassin: 185 pts
Sniper Assassin: 185 pts
Terror Assassin: 200 pts
Crusaders (3): 70 pts
Daemon Hosts (3): 70 pts
Psychics (3): 95 pts
Battle Brothers (5) w/ Veteran Infantry, Standard, plasma pistol, energy sword, plasma cannon: 260 pts

Total: 1225 pts

Now we need to add a little mobility and some anti-vehicle firepower, together with a few foot troops to defend objectives and widen the range of targets. But as you can see, we're well on the way to 2,000 points, and we're right on budget for now -- plus there's still a lot of good stuff on the sprues that we haven't used yet. 


Saturday, 8 May 2021

The Good Bad Idea: Some speed-painted orks

 The other day I had one of those ideas that comes to you as though in a dream: an idea for how to bulk up my year's painting total, provide a team for anyone who wants to play Stargrave with me but doesn't have models, and test some techniques in the process. It preyed on me all of Monday night, and on Tuesday I got to work. By Saturday morning I had this: 


If you are a British gamer, I think you have some Space Marines. You may never have played Warhammer 40,000 in your life, but you'll have some. I think they grow in cardboard boxes or someone puts them through the letterbox. Only marginally rarer are the multi-part plastic Orks from ... Assault on Black Reach, I think? Anyway, I have a few, plus some other Ork kits, in a big tackle box, and I'm never going to use them because they don't blend well with my Ork army, which is in an older style. So I put some together, with some spare parts from the bits box (mostly Ramshackle Games stuff). This was actually a pretty long process -- about two to three hours. I mounted them on plastic bases from Renedra and textured their bases with acrylic modelling paste from Hobbycraft. 


I primed them with Halford's matt black spray paint and then gave them a zenithal spray with Halford's grey primer. This is a quick and dirty way of creating some shadow and contrast: very important for speed painting. 


Now the actual painting process began. I mainly used cheap craft paints in dark red, brown, ochre, silver, black, yellow, and white. I did use a few actual miniatures paints, which were: 

  • Citadel Mephiston Red. My go to mid-red base colour. 
  • Citadel Evil Sunz Scarlet. My orky bright red. Remember when Citadel reds were just trash?
  • Citadel Warboss Green. This has been in my paint box ever since that lying swine in GW said it was a good match for old Goblin Green, which it is not. 
  • Citadel Ushabti Bone. A pleasing colour for teeth.
  • Your friend and mine, Agarax Earthshade. I actually intended to use Army Painter Strong Tone, but it turns out I haven't got any. 
I flicked brown, black, and white paint at the models with a toothbrush. This might seem like a mad thing to do, but it's really just there to help create a feel of texture and weathering that should show through the coats of paint. It'll save a lot of time, especially on the metallics. This process took about 10 minutes. 


Next I blocked in the base colours using thin layers. I didn't both to make the coverage very even on anything but the skin, and I really just jabbed the silver paint (mixed with a little black) onto the metallics. As you can see, they look rusty and nasty, which is what you want for orks. I did this in a series of steps, each about 10-15 minutes, but the whole process took about an hour and fifty minutes. Counting flecks, that's two hours. 


Here's the whole crew with their base colours hastily applied.

I did a tiny highlight of the skin with a mixture of green and yellow, and then I hit the whole model with that Agarax Earthshade wash -- including the green areas. It looks OK! This took about 15 minutes.


Then I went back and touched up and re-highlighted the skin with that green-yellow mixture. I also dotted in the eyes with ochre and then a little splotch of yellow in the centre. This took about another 15 minutes. 


Finally, I took each model and spent a few minutes doing the individual details -- picking out pouches, straps, fur trim, goggles and so on. I didn't want them to be perfect, and I could have skipped it, but it didn't take that long and I think it helps, particularly on fiddly areas like the captain's goggles. I rehighlighted some of the metals as well and just touched up a missed patch here and there. This was actually one of the longest phases, taking nearly an hour. 

When you add up all of that time, the process took just under three and a half hours. Adding in priming and some other things I'm probably forgetting, I'm happy to round up to four hours, or an average of 24 minutes per model. I think that they're pretty good-looking for that level of investment, and I 

The crew assembled

Captain (Cyborg) and First Mate (Veteran)

Two Sentries and a Commando, or a Trooper, I forget.

Gunner and Burner

Two Recruits

A Runner


Monday, 18 May 2020

Inquisitor on the cheap: fun with 54mm models

A few months ago, I was chatting with Curtis of Ramshackle Games. I had just been notified that a lot of my classes had been cancelled (I am fine; please don't worry) and I was feeling a bit down. We got chatting about playing games with larger-scale figures for that proper "toy soldier" feel; we also discussed the old GW game Inquisitor, which used 54mm scale models and consequently always felt a bit inaccessible because of the high price point. He mentioned the cheap toy soldiers produced by Russian firm Tehnolog. Browsing eBay, I discovered that I could get a random assortment of 50 models for under £30. 

I have always had a bargain problem. The mental conversation goes something like this: 
Me: Wow, James, 50 models for £30. That's 60p a model. What a bargain!
Also me: It's not a bargain if I don't want 50 models in the first place. 
Me again: But think of the savings!
So that's how I wound up ordering 50 random 54mm models off eBay. It was a nice little treat to get myself in an uncertain time, and as I made the transition to working from home I had the fun of anticipating when my armyman playtoys would arrive. And arrive they did!


As you can see, I got a pretty good mix. There are elves, dwarves, knights, Vikings, samurai, orcs, undead, futuristic soldier types, historical soldier types ... all sorts. A pretty promising start for some future-fantasy conversions. I decided my party would be the crew of a Rogue Trader. These are the flamboyant space pirate crews who act as deniable agents of Imperial interest but often include lots of shady characters. Unlike most groups in the Warhammer 40,000 setting, Rogue Trader crews are highly diverse, and could include robots, aliens, mutants ... whatever! It seemed like a good start for an adventuring party. 

I began with my Rogue Trader himself. I loved the authoritative pose of the Cossack officer figure, but I wasn't wild about the hat. I decided to cut the fancy tricorn-hatted head off one of the figures representing soldiers of the Preobrazhensky regiment. 


I added a few flourishes and we were off. One of the things I learned here was that scale is very much an illusion. The plume and ornament here are from GW models -- nominally 28mm -- but they look fine on the 54mm character. In the heroic sculpting style of GW minis, items that the viewer should focus on, such as weapons, can be very exaggerated in size, meaning that they look much larger when you put them on more realistically scaled models. 


I also gave him some Imperial bling for the back of his cloak. 


As soon as I saw this Joan of Arc type model, I knew she would be a great Sister of Battle. She even has the distinctive bob haircut that you see on a lot of those models. I didn't like the weapon she was carrying, so I cut it off, together with the whole forearm. The replacement right arm is from an old Chaos Warrior, and the sword is a Reaper accessory. I thought the hooded, winged figure looked suitably spiritual.  


And here they are, my Rogue Trader crew! From left to right: 
  • Ron Jambo is an Imperial guard veteran who became a mercenary after his unit was betrayed and left to die on a remote death world. The only conversion I did to this model was to cut off the feathers tucked into his headband, which I felt were a bit much. You can't see it, but he has an Imperial Aquila tattoo on his left shoulder. 
  • Sister Eleutheria is a Battle Sister of the Order of the Sacred Rose (I picked them because I liked their colour scheme: white armour and black robes with scarlet linings). But she's also Captain Mortsafe's cousin, and the family pulled some strings to get her assigned to this mission. Her power sword provides some close-up punch. 
  • Lord-Captain Anaximander Mortsafe is a dandy space pirate with a fancy hat. He is more of an investigator than a fighter, but he can handle himself if he has to, fighting with exotic alien sword and dagger. The reliquary at his neck also houses a force field generator. He is accompanied by his loyal servo-skull, Skully
  • Combat Automaton 80-N35 is an experimental device created by Mortsafe's chief engineer Volund (whose model I plan to get started on any day now). 80-N35 lays down heavy firepower with his shoulder-mounted plasma gun. 
  • Major Kuznetsov commands the detachment of Mortsafe household troops stationed aboard the Lord-Captain's vessel. He's a disciplined and determined officer, often driven to frustration by his employer's reckless curiosity. He bears a hot-shot laspistol as his sidearm. I decided this was a lasweapon despite its bolty barrel because the question of what the magazine was doing right behind the muzzle was driving me nuts. I decided that it was clearly just a battery pack and could therefore attach to the weapon anywhere. 
And that's the crew! Next I need to work on some opposition for them. I'm thinking a Chaos cult -- and, unusually for me, I'm thinking Khorne rather than Nurgle! Time for a little change-up. I'm going to make them as filthy and gore-splattered as these guys are clean and colourful. 


I also sent off selections of models to a couple of other people who created their own warbands. One of those was game designer and publisher Grant Howitt, who has just posted photos of his cool Inquisition party. Check them out here!

Sunday, 29 September 2019

Redeeming some not-great miniatures

Earlier this year, I replied to an ad on Facebook Marketplace offering a big job lot of Warhammer figures. I really wanted the plastic Rogue Trader Imperial Guard and some Genestealers that were in the lot, but I also wound up with a bunch of the early multi-part Chaos Warriors. These miniatures are ... not kindly remembered. They're hunched and ugly, and usually thought of as not as good as the subsequent, more upright models with the cloaks. But I had a load of them. 


As you can see, they have a stooped, hunched posture with weird, long, gangly arms, and the metal halberd arms are pretty crude. The upper and lower parts of the halberd don't even line up clearly. 

Anyway, I decided that since these models were a bit crude and since I tend to play Nurgle, I would paint them up in a beat-up and rusty paint scheme that would focus on overall effect rather than individual detail. 

I was inspired by a rust-painting workshop I did at BOYL 2019, taught by Curtis Fell of Ramshackle Games, whose rusty paint jobs have always impressed me. Here's the rust-work I did on the model from that workshop (I later went back and did the cloth and so on). 


I don't think I achieved the same effect here, but that was the inspiration. 

I put my test models together and primed them black. This will be more forgiving for the loosey-goosey paint scheme I'm going to apply. 


Next, I just took a big brush and jabbed this thing over and over with brown masonry paint to give it the necessary flat, dark brown colour. I didn't care if this clogged up the detail, because ... well, you know.


Then I applied a few more stages. Again using a big brush, I applied gunmetal grey over the exposed edges and points, bringing out the edges of the armour plates, blades and so on. Then I flicked watered-down orange-brown paint at the model with a toothbrush to add some rust.

I picked out a few details in a bright fluorescent green that I thought would stand out against the dull background.


Next, I went back and tidied up some sections with thinned-down black. If there were soft boots I did those, for instance, I painted the weapon hafts, and in some places I cleaned up the joints between armour plates. I also added some bone colour to the decorative skulls, the horns, and what have you. 


I wanted to add one feature to each of these guys that would stand out, and I resolved on giving them weird shields. I went into the bits box and pulled out various bits and pieces that would do, including some Reaper Bones shields and a Renedra tombstone. Then I did the bases. 


I've got three in so far, and I think they look pretty OK! I'm going to do a leader and a standard bearer to bring them up to a standard unit of 5, just to complete the project. But for models I can polish off in a spare hour or two, I'm really happy with them. 

Saturday, 28 September 2019

Simple terrain from scraps

As you know if you read my blog, I like making cheap gaming materials from junk. This is for several reasons: I like the stimulus to creativity, I like the affordability and I like reusing things that would otherwise wind up in landfill.

So imagine my delight when I discovered the Cambridge Community Scrapstore. This is a place you can go that's just basically a big warehouse full of crafting bits and bobs. I bought a membership and have been a few times, filling my cheek pouches with bits of fabric, card, and miscellaneous junk.

Among the things I got on my first trip were some sheets of fake grass material. I marked out some rough shapes on the back of the sheets with a silver Sharpie, then cut them out with a utility knife.


At this stage, I also brushed the fake grass material a lot because it sheds like mad, especially if the cuts go through the base of a tuft.

The base of the material is flexible, but I wanted to stiffen it a little, so I hot-glued the pieces to sheets of card, which I also got at the scrapstore.


I then cut out the shapes, leaving a little bit of a lip around each one. After cutting out about a third of my grass material, I had enough to fill a shoebox.


These pieces then got a bead of hot glue to seal the edge between the grass material and the card, then a layer of PVA and sand. I let that dry, then painted it light brown with a lighter drybrush and called it good.

As you can see, they're a bit rough and ready, but at a price of pennies I'm perfectly happy with them. They'll serve as reed beds in Frostgrave: Ghost Archipelago or my Crusades games, or long grass in other settings. Here's the same patch of long grass with a model for scale.


Apparently, these scrapstores aren't uncommon, so if you like to trash bash you should see if there's one in your area. I expect more frugal gaming posts inspired by the things I find there.

Thursday, 15 August 2019

I have been painting some things!

I realise this blog has been quiet for a long time. Blame the siren song of Facebook and the less siren but much more remunerative song of blogging for the Gaming the Crusades project! However, I was inspired by my annual trip to Bring Out Your Lead to get some painting done in the week or so afterward. 

First on the table were these models from a standby of this blog, ThunderChild Miniatures. By now you know that I love Jason Fairclough's 3D-cartoon style, and these little guys are no exception to that rule. I bashed the whole squad out in a relaxing Sunday afternoon. Very simple paintjobs but I think they came out quite nicely. 


Next up is one of Mark Copplestone's lovely halflings from the old Grenadier fantasy range. I believe this little guy is still available from Mirliton, although I haven't checked. He was part of a very thoughtful gift from a friend literally years ago -- in fact, I got him around BOYL 2016, maybe? Anyway, he is great and will represent my character, Lucullus Mortsafe, in a D&D game even though the game does not include miniatures. If I had him to do over again I would redo the sleeves; the contrast between the layers is too stark. Also the primer went on quite grainy, although you can't really see it here. 


These Daleks are from Doctor Who magazine and now that I look at them I realise that they are of two slightly different designs. Curious! Anyway, I primed them and then "painted" them with silver and black Sharpie. I'm not gonna do that with the grey primer again; it was a real hassle.


Anyway: I am not dead.

Tuesday, 28 November 2017

Frugal gaming: a lot of model for £1.

Today's episode of Monster Man is going to focus on giants, so I thought I'd take the opportunity to finish up a project I'd had sitting on a shelf for ... well, I think for a year or so, to be honest.

Anyway, here it is: it's a pretty simple creation. All I did was take this toy from Poundland, straighten out his axe a bit with some hot water, put a coat of car primer on him, and paint him. You could probably do more to make him look good; I'm aware that he looks pretty rough. A design on the shield would be pretty cool, for instance, and I could have done more with the mould lines. Still, given that he cost me £1 plus the last of my really big Reaper bases, I'm pretty comfortable with how it worked out. 

The toy line is called Terra and this guy is "Halldor the Raider."


In the meantime, my Frost Giants from the Reaper Bones 3 Kickstarter arrived and this guy is totally incompatible with them in terms of style and scale, but whatever. He's done and he looks OK, so I am content. 

Wednesday, 4 October 2017

Frugal gaming: Easy flagstone dungeon floors

I like using miniatures in my D&D games, as I have probably mentioned once or twice, but the expense of resin or plastic dungeon sets has always put me off. Paper ones are fine, but you have to put a good amount of work into them to make them look good and stay on the tabletop without sliding, and just drawing on a map or using the bare tabletop and having pencils and things for walls is nice but lacks visual panache. 

I think, however, I've figure out what I'm going to do from now on. 

I was making road scenery inspired by a video from The DM's Craft on YouTube, and I picked up a bunch of craft foam to make it with. The stuff I was using for my pavements was this grey foam: it comes in more-or-less A4 sheets and sells for 50p at Hobbycraft. You can probably get it cheaper and larger elsewhere. 


This stuff is soft, cheap, and easy to work with. When creating the pavement, I learned that the way to do cracks and texture on it was simply to draw on it with a blunt pencil. You don't want a sharp point, which will tear the foam: you want a nice rounded one that you can press into the surface. It will leave a darkened indentation that creates texture. 

With my blunt pencil, I drew in a grid of 1-inch squares. 


Then I went over it, adding cracks, stippling and so on to give the squares a little texture and variety. I also added a small border and trimmed off the excess. 


Depending on your preference, you could either cut this into corridor and room shapes or you could just use it as a base and form your rooms with free-standing walls. Which reminds me that I should probably make some walls. I'm going to keep mine in complete sheets because that way I can also use it for plazas, courtyards and so on when doing urban terrain. 

I mainly did this so that I could use it as a base when taking the photos of miniatures I use to promote my podcast, MONSTER MAN. Here's an example: 


So, yeah, cheap and easy to make: I did a sheet of these in about 10 minutes while watching TV last night. Next time I'm in town I'll try to pick up some more; it'll give me a project to work on in idle moments.